Microscopy in microbiology opens the door to a world we can’t see with the naked eye. Without it, bacteria, fungi, protozoa, viruses, and almost every microbial activity would stay hidden. More than just showing us tiny organisms, microscopy helps us understand how they move, interact, grow, and even trigger disease. From basic bright field setups to advanced super-resolution systems, these tools guide everything from medical diagnosis to major research breakthroughs.
This technology has completely reshaped microbial science. When Robert Hooke first observed cork cells and Antonie van Leeuwenhoek described his famous “animalcules,” an entirely new universe revealed itself. That moment kicked off centuries of scientific progress. Today, microbiologists use powerful imaging techniques. They explore cell ultrastructure and watch live-cell behavior. They also study biofilms and visualize protein complexes down to near-atomic detail.
But microbes are tiny, most bacteria measure only 0.5 to 5 micrometers. Because of this, high resolution, strong contrast, and careful sample preparation are absolutely essential. The human eye can’t resolve objects below about 100 µm. Therefore, we depend on optical physics and numerical aperture. We also use contrast-boosting techniques like staining and fluorescence. These strategies help reveal microbial shapes, textures, and internal structures with clarity and precision.
In this guide, we will explore the definitive types of microscopy, the physics behind them, and how to choose the right technique for your specific research questions. We will move beyond textbook definitions. We will explore real-world applications. This ensures you understand not just how these instruments work, but why they matter.
Basic Principles of Microscopy
1. Magnification vs. Resolution
Many people confuse magnification with resolution, but they’re fundamentally different. Magnification simply makes things appear larger. Resolution is the ability to distinguish two adjacent points as separate entities.
You could magnify a blurry image 1000x, but if the resolution isn’t there, you’ll just get a bigger blur. In microbiology, we need both. We need enough magnification to see bacteria comfortably. Adequate resolution is also necessary to notice their structural details like cell walls, flagella, or internal organelles.
The greatest useful magnification is roughly 1000 times the numerical aperture of the goal lens. Beyond that, you’re creating “empty magnification”, making things bigger without revealing more detail.
2. Numerical Aperture and Light Collection
Numerical aperture is a crucial spec that often gets overlooked by beginners. It measures how much light a lens can gather from the specimen. Higher NA means better resolution and brighter images.
The formula involves the refractive index of the medium between the lens and specimen, plus the half-angle of light collection. Oil immersion objectives use oil (refractive index ~1.515) instead of air (refractive index 1.0) to achieve NA values up to 1.4, dramatically improving resolution.
For microbiology work, you’ll typically use 100x oil immersion objectives with NA around 1.25-1.4 for observing bacterial morphology and stained preparations.
3. Optical Contrast: Staining, Phase, and Fluorescence
Most living microbes are nearly transparent. Without contrast enhancement, they’re invisible even under a microscope. Microbiologists use three main approaches to create contrast.
Staining techniques use dyes that bind to specific cellular components. Crystal violet sticks to peptidoglycan in bacterial cell walls. Fluorescent stains like DAPI bind to DNA, glowing brightly under UV excitation.
Phase contrast microscopy converts phase shifts in light passing through transparent specimens into amplitude changes we can see. This allows observation of living, unstained bacteria without killing them first.
Fluorescence microscopy uses fluoroscopes, molecules that absorb light at one wavelength and emit it at another. This creates spectacular contrast and allows specific labeling of proteins, nucleic acids, or even metabolic activity in real time.
4. Sample Preparation Basics
Sample preparation can make or break your microscopy results. For bright field work, you’ll prepare thin smears, fix them with heat or chemicals, and apply appropriate stains.
Live-cell imaging requires mounting samples in physiological media, often between a slide and coverslip. Temperature control and oxygen availability become critical for maintaining normal microbial behavior.
Electron microscopy requires a more rigorous preparation. It involves chemical fixation and dehydration through an alcohol series. Embedding in resin and sectioning with diamond knives is needed for TEM. Alternatively, it requires critical point drying and metal coating for SEM.
Decision Matrix — Choosing the Right Microscopy Technique
Selecting the right microscopy method depends on your specific research question. Here’s a comprehensive decision matrix to guide your choice:
| Technique | Best Use Case | Resolution | Sample Type | Key Advantage | Main Limitation |
|---|---|---|---|---|---|
| Bright field | Routine identification, stained samples | ~200 nm | Fixed, stained | Simple, fast, inexpensive | Requires staining (kills cells) |
| Phase Contrast | Live bacteria observation, motility | ~200 nm | Living, unstained | Preserves viability | Halo artifacts around edges |
| Fluorescence | Specific labeling, pathogen detection | ~200 nm | Labeled samples | High specificity, multiplexing | Photobleaching, expensive dyes |
| Confocal | 3D biofilm structure, thick samples | ~180 nm | Fluorescently labeled | Optical sectioning, 3D reconstruction | Expensive, slow acquisition |
| SEM | Surface ultrastructure | ~1-5 nm | Fixed, coated | Stunning 3D surface detail | Requires vacuum, expensive |
| TEM | Internal structures, viruses | ~0.1 nm | Ultra-thin sections | Highest resolution available | Complex prep, 2D images only |
Types of Microscopy Used in Microbiology
1. Brightfield Microscopy
Principle: Brightfield microscopy is the most basic and widely used technique. Light passes directly through the specimen from below, and structures absorb different amounts of light based on their density and staining properties. The result is dark objects against a bright background.
When it’s used: Brightfield excels for routine clinical diagnostics, teaching labs, and any application where permanent, stained slides are acceptable. It’s perfect for bacterial identification using Gram staining, observing fungal morphology, and examining blood smears for parasites.
Advantages & Limitations: The advantages are compelling: low cost, simple operation, readily available equipment, and compatibility with standard staining protocols. The major limitation is that specimens must be stained or naturally pigmented to be visible, which means killing most microorganisms.
Microbiology-Specific Examples: Gram staining remains the gold standard for bacterial classification. Gram-positive bacteria keep crystal violet and appear purple, while Gram-negative bacteria take up the counterstain (safranin) and appear pink. This simple test provides immediate clinical information about cell wall structure and guides antibiotic choice.
Observing fungal hyphae and spores under brightfield microscopy is helpful. It aids in recognizing species like Candida albicans, Aspergillus fumigatus, or dermatophytes that cause skin infections. Lactophenol cotton blue stain provides excellent contrast for these structures.
2. Darkfield Microscopy
Darkfield microscopy flips the brightfield approach on its head. A special condenser blocks direct light from reaching the goal, allowing only light scattered by the specimen to form the image. Microbes appear as bright objects against a dark background.
This technique is perfect for thin or motile organisms that are difficult to stain. The classic example is Treponema pallidum, the spirochete that causes syphilis. These bacteria are too thin to see with brightfield microscopy and don’t stain well with conventional dyes.
Under darkfield illumination, T. pallidum appears as bright, corkscrew-shaped organisms showing characteristic motility. This remains an important diagnostic method for primary syphilis lesions. Darkfield also works beautifully for observing bacterial flagella in motion without special staining.
3. Phase Contrast Microscopy
Phase contrast microscopy revolutionized microbiology by making living bacteria visible without staining. It works by converting phase differences in light waves (caused by variations in specimen thickness and refractive index) into amplitude differences we perceive as contrast.
This technique is ideal for live, unstained bacteria. Researchers use it extensively to observe bacterial growth, cell division, and most importantly, motility. You can watch bacteria swim in real-time, observe their tumbling behavior, and study chemotaxis.
The main drawback is halo artifacts that appear around specimen edges. These can obscure fine details. Despite this, phase contrast remains essential for studying bacterial behavior under near-natural conditions. It’s particularly valuable for long-term time-lapse imaging of bacterial populations.
4. Differential Interference Contrast (DIC)
DIC microscopy, also called Nomarski microscopy, creates pseudo-3D images with remarkable depth and detail. It uses polarized light and special prisms to detect gradients in optical path length across the specimen.
The technique produces 3D-like imaging that’s especially useful for larger microorganisms. Protozoa like Paramecium or Amoeba show stunning internal detail. Yeast cells reveal budding scars, vacuoles, and nucleus positions clearly.
DIC works exceptionally well for microeukaryotes—organisms like algae, protozoa, and microscopic fungi where internal structure matters. The technique provides clearer images than phase contrast without the halo artifacts, though the equipment is more expensive and complex to set up.
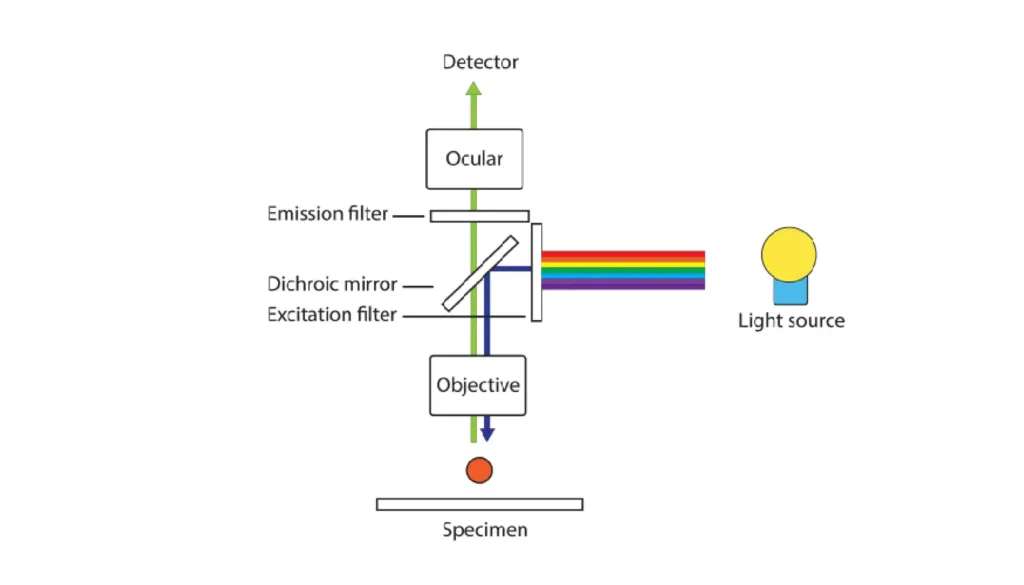
5. Fluorescence Microscopy
Fluorescence microscopy has become indispensable in modern microbiology. Fluorophores absorb light at specific wavelengths and emit it at longer wavelengths. This creates brilliant, high-contrast images against dark backgrounds.
Common fluorophores include DAPI (which binds DNA and emits blue light), FITC (fluorescein, emitting green), and rhodamine (emitting red). Genetically encoded fluorescent proteins like GFP allow researchers to label specific proteins and track them in living cells.
Detecting Pathogens: Fluorescence microscopy excels at pathogen detection. Immunofluorescence uses antibodies tagged with fluorophores to pinpoint specific bacterial species in clinical samples. FISH (fluorescence in situ hybridization) uses fluorescent DNA probes to detect particular microorganisms in complex environmental samples.
DNA Visualization: DAPI staining reveals nucleoids in bacteria, helping researchers study chromosome organization and segregation during cell division. It’s also used to count total bacterial cells in environmental samples, distinguishing them from non-living particles.
Clinical Relevance: Fluorescence microscopy is used daily in clinical labs. Auramine-rhodamine staining helps identify Mycobacterium tuberculosis in sputum samples. Calcofluor white stains fungal cell walls, making diagnosis of fungal infections faster and more sensitive than conventional staining.
6. Confocal Laser Scanning Microscopy
Confocal microscopy takes fluorescence imaging to the next level by adding optical sectioning ability. A pinhole blocks out-of-focus light, allowing the microscope to capture sharp images from specific depths within thick specimens.
Z-Stacking and 3D Imaging: By collecting optical sections at different depths and computationally stacking them, confocal microscopy creates 3D reconstructions. This is transformative for understanding complex microbial structures.
Example: Biofilm Architecture: Bacterial biofilms are 3D communities encased in extracellular matrix. Confocal microscopy reveals their architecture—cell distribution, channel networks for nutrient flow, and spatial organization of different species in mixed biofilms.
Researchers use confocal imaging to study how biofilms form on medical implants. They examine how antibiotic gradients affect bacterial survival in deep biofilm layers. They also study how different bacterial species spatially organize in complex communities like dental plaque.
Electron Microscopy in Microbiology
1. Scanning Electron Microscopy (SEM)
SEM uses a focused beam of electrons to scan across a specimen’s surface. The electrons interact with surface atoms, producing signals that reveal topographical and compositional information.
Surface Details: SEM provides extraordinary surface detail at magnifications from 10x to over 500,000x. The depth of field is much greater than light microscopy, creating those dramatic 3D-looking images you see in textbooks and scientific papers.
Bacterial Surface Structures: SEM reveals surface features invisible to light microscopy. You can see the texture of bacterial cell walls, surface proteins, pili, and the glycocalyx (slime layer) that some bacteria secrete.
Example: Pili and Flagella: Bacterial pili are short appendages used for attachment and DNA transfer. Flagella are long whip-like structures for motility. These structures are beautifully resolved in SEM images. You can count flagella, find their arrangement (polar, peritrichous, etc.), and watch how bacteria attach to surfaces using pili.
SEM images of Escherichia coli clearly show peritrichous flagella distributed across the cell surface. Vibrio cholerae displays its single polar flagellum. These structural details help classify bacteria and understand their motility mechanisms.
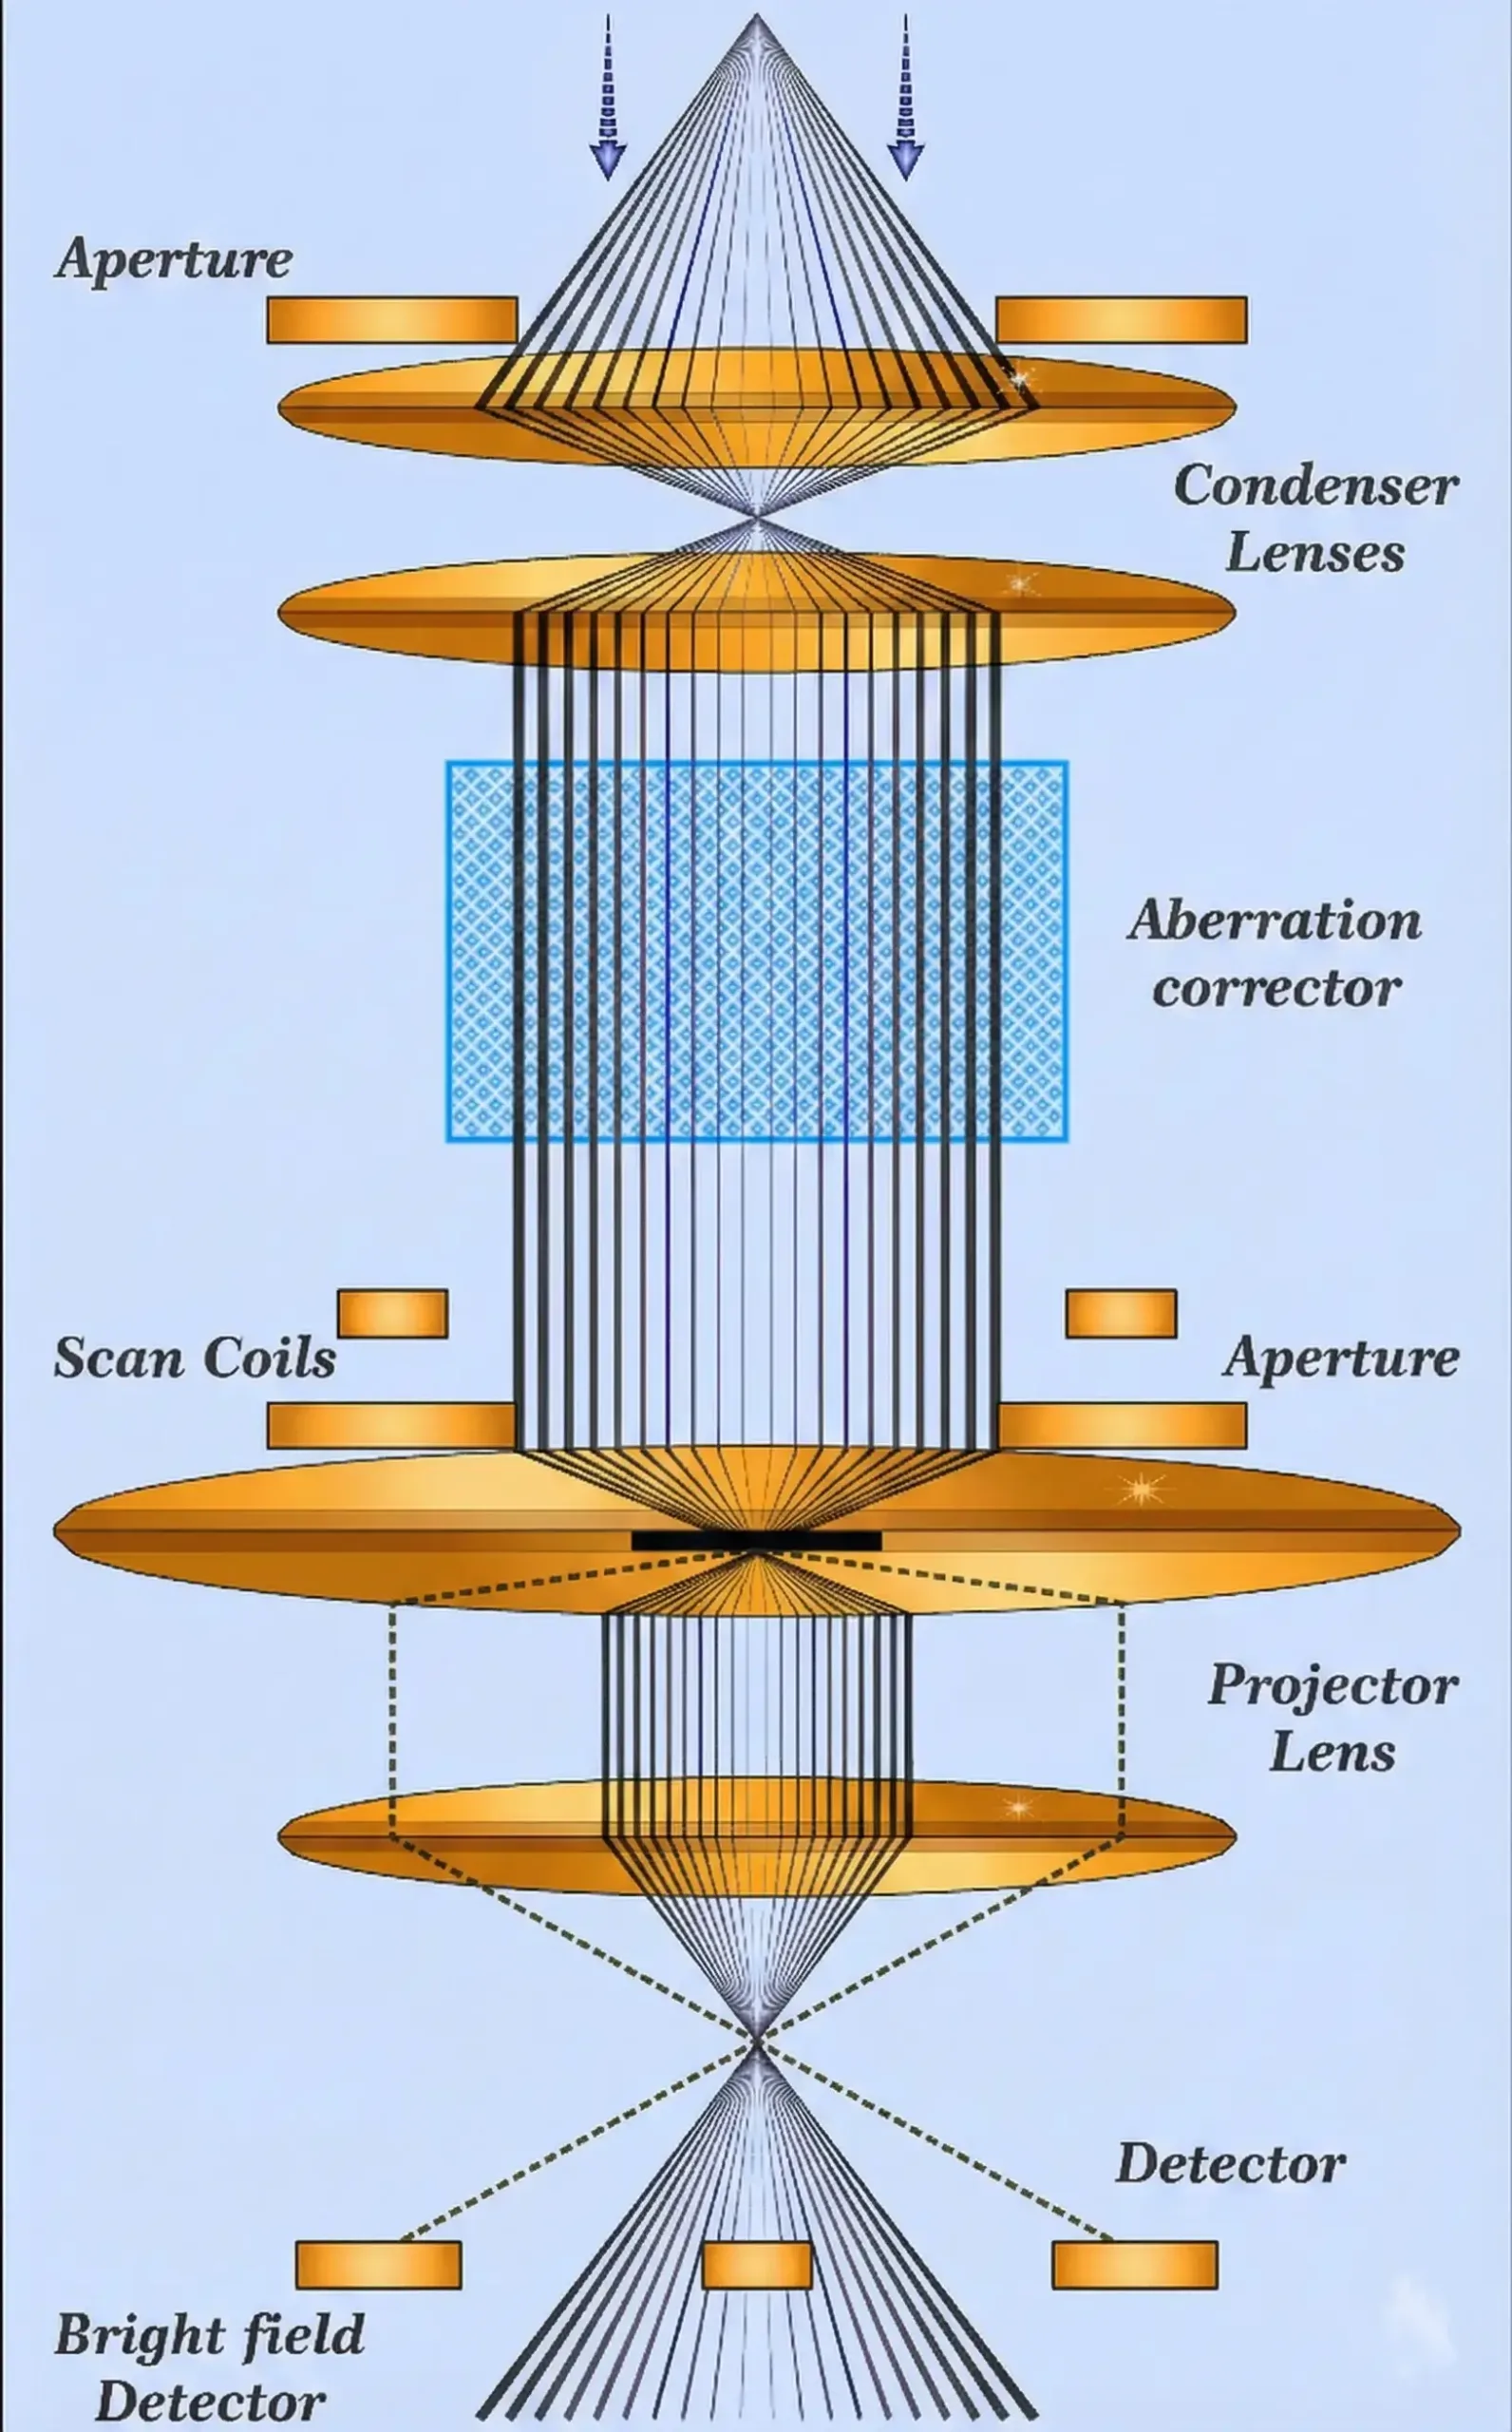
2. Transmission Electron Microscopy (TEM)
TEM shoots electrons through ultra-thin specimens (typically 50-100 nanometers thick). Electrons pass through less dense regions and are absorbed or scattered by denser regions, creating contrast in the final image.
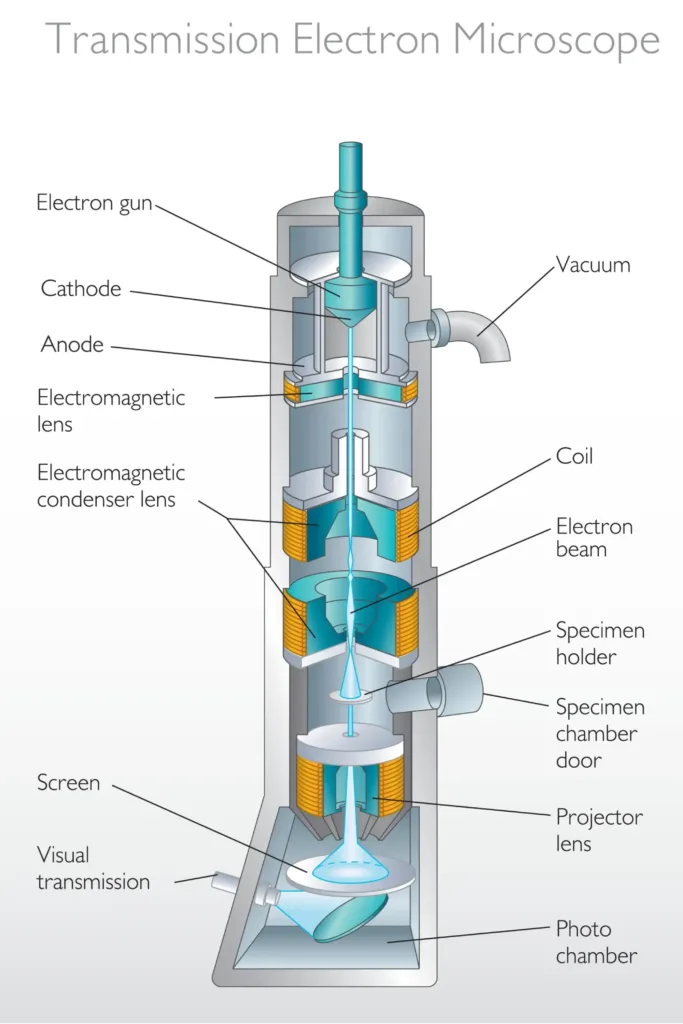
Internal Ultrastructure: TEM excels at revealing internal cellular architecture. In bacteria, you can visualize the cell membrane, cell wall layers, ribosomes, inclusion bodies, and nucleoid region where DNA concentrates.
Example: Viral Particles: TEM is essential for virology. Viruses are too small for light microscopy (most are 20-300 nanometers). TEM reveals viral morphology—icosahedral, helical, or complex structures—which is critical for classification.
Negative staining with heavy metal salts (uranyl acetate, phosphotungstic acid) makes viruses stand out against dark backgrounds. This technique revealed the structure of bacteriophages, HIV, influenza, and SARS-CoV-2.
Bacterial Cell Walls: TEM shows the difference between Gram-positive and Gram-negative cell walls at the ultrastructural level. Gram-positive bacteria have thick peptidoglycan layers (20-80 nm). Gram-negative bacteria show thin peptidoglycan (2-7 nm) sandwiched between inner and outer membranes.
3. Cryo-Electron Microscopy
Cryo-EM is revolutionizing structural biology. Samples are rapidly frozen in liquid ethane, creating vitreous ice that preserves native structures without chemical fixation or staining.
Native-State Imaging: Traditional EM preparation involves fixation, dehydration, and staining—processes that can distort structures. Cryo-EM captures specimens in their near-native state, frozen so quickly that water doesn’t form damaging ice crystals.
Used for Viruses and Protein Complexes: Cryo-EM has determined structures of countless viruses and large protein complexes at near-atomic resolution. The 2017 Nobel Prize in Chemistry recognized cryo-EM’s transformative impact.
Modern Impact: During the COVID-19 pandemic, cryo-EM rapidly revealed the structure of SARS-CoV-2’s spike protein, accelerating vaccine development. It’s now routine for determining structures of bacterial ribosomes, molecular machines like the flagellar motor, and membrane protein complexes.
Advanced & Emerging Microscopy Techniques
Super-Resolution Microscopy (STED, SIM, PALM/STORM)
Super-resolution microscopy breaks the diffraction limit of light, achieving resolution down to 20-50 nanometers. Three main approaches won the 2014 Nobel Prize in Chemistry.
STED (Stimulated Emission Depletion) uses two laser beams. One laser beam excites fluorophores. The other laser beam selectively disables fluorescence everywhere except a tiny spot. SIM (Structured Illumination Microscopy) uses patterned illumination and computational reconstruction.
PALM/STORM (Photo-Activated Localization Microscopy / Stochastic Optical Reconstruction Microscopy) work by precisely localizing individual fluorescent molecules across many frames. They then reconstruct a super-resolution image.
These techniques reveal nanoscale bacterial structures: protein clustering in membranes, chromosome organization, and the molecular architecture of the bacterial cytoskeleton.
Atomic Force Microscopy (AFM)
AFM isn’t optical—it uses a tiny probe that physically scans across specimen surfaces, measuring forces at the atomic level. The probe moves up and down following surface contours, creating 3D topographical maps.
AFM works in air or liquid, making it perfect for living bacteria. Researchers can measure mechanical properties like cell wall rigidity, map surface molecules, and even observe biofilm formation in real-time.
The technique reveals nanoscale surface features. It shows individual protein molecules on bacterial membranes. It also reveals pore complexes and the arrangement of peptidoglycan in cell walls. AFM also measures bacterial adhesion forces, important for understanding biofilm formation and infection mechanisms.
Correlative Light & Electron Microscopy (CLEM)
CLEM combines fluorescence and electron microscopy on the same specimen. Researchers first use fluorescence to identify cells or structures of interest, then examine those exact locations with EM’s superior resolution.
This workflow solves a major problem: EM provides incredible detail but you are looking at a tiny area. How do you find rare events or specific cells? CLEM uses fluorescence as a roadmap, then zooms in with EM.
Applications include tracking fluorescently-labeled proteins to their precise ultrastructural locations. They also involve studying host-pathogen interactions by marking infected cells before EM. Another application is correlating bacterial gene expression (via fluorescent reporters) with cellular morphology.
Sample Preparation Techniques for Microbiology
Smear Preparation
Creating a good bacterial smear is fundamental. Place a drop of water on a clean slide, add a small amount of bacterial culture with a sterile loop, and spread it into a thin film. Air dry completely, then pass through a flame 2-3 times to heat-fix.
Heat fixation kills bacteria and makes them stick to the slide. Too much heat causes distortion. Too little means bacteria wash off during staining. Getting this right takes practice but dramatically affects your results.
Fixation and Staining
Chemical fixation preserves cellular structure by cross-linking proteins. Common fixatives include formaldehyde, glutaraldehyde, and methanol. Each has different properties—formaldehyde penetrates quickly, glutaraldehyde provides better structural preservation.
Staining follows fixation. Simple stains use a single dye. Differential stains like Gram staining use multiple dyes to distinguish cell types. Special stains target specific structures: endospores, flagella, or capsules.
The Gram stain procedure: apply crystal violet, add iodine (mordant), decolorize with alcohol, and counterstain with safranin. Timing is critical—over-decolorization makes Gram-positive bacteria appear Gram-negative.
Live-Cell Imaging Workflow
Live-cell imaging requires maintaining physiological conditions. Use chambered slides or flow cells that allow media perfusion. Temperature control (usually 37°C for pathogens) and appropriate atmosphere (CO₂ for some bacteria) are essential.
Reduce phototoxicity by minimizing light exposure. Use sensitive cameras that work with low illumination. Consider spinning disk confocal microscopy instead of point-scanning systems for faster, gentler imaging.
Preparing Samples for SEM/TEM
SEM preparation involves several steps. First, fixation with glutaraldehyde is performed. Next, samples undergo dehydration through graded alcohols. Then, critical point drying is applied to prevent collapse. Finally, samples are sputter coated with gold or platinum to make them conductive.
TEM requires even more elaborate preparation. After fixation, samples are embedded in resin and cured. Then they are sectioned with an ultramicrotome using diamond knives to create 50-100 nm thick sections. Sections are stained with heavy metals (uranyl acetate, lead citrate) to enhance contrast.
Troubleshooting & Common Imaging Problems
1. Low Contrast
Causes: Insufficient staining, incorrect microscopy technique for specimen type, dirty optics
Solutions: Increase staining time, try different contrast methods (phase contrast for live cells), clean all optical surfaces with lens paper
2. Blurry Image
Causes: Improper focus, wrong immersion oil, dirty objective, coverslip thickness mismatch
Solutions: Focus carefully at each magnification level, use correct immersion oil, check objective correction collar settings
3. Auto fluorescence
Causes: Natural fluorescence from growth media components, cellular metabolites (NAD(P)H), fixatives
Solutions: Wash samples thoroughly, use red-shifted fluorophores (less autofluorescence), try spectral unmixing
4. Photobleaching
Causes: Prolonged light exposure destroying fluorophores
Solutions: Add anti-fade reagents, minimize light exposure, use more photostable dyes, increase camera sensitivity to reduce illumination needs
5. Overstained Samples
Causes: Too much stain, excessive staining time
Solutions: Reduce staining time, dilute stains, improve washing steps
6. Contaminated Slides
Causes: Dirty slides, contaminated staining solutions, poor technique
Solutions: Use pre-cleaned slides, filter staining solutions, maintain sterile technique during sample preparation
Practical Applications in Modern Microbiology
1. Identifying a Bacterial Pathogen Using Fluorescence Microscopy
Scenario: A patient presents with respiratory symptoms. Sputum samples are collected and standard culture shows slow-growing organisms suspected to be Mycobacterium tuberculosis.
Approach: Auramine-rhodamine fluorescent staining is applied. This lipid-soluble dye penetrates the waxy mycobacterial cell wall and fluoresces bright yellow-orange under UV excitation.
Results: Characteristic acid-fast bacilli appear as glowing rod-shaped bacteria against a dark background. The fluorescence technique is 10% more sensitive than conventional Ziehl-Neelsen staining and much faster to read.
Clinical Impact: Rapid diagnosis allows earlier treatment initiation and infection control measures. The patient is isolated, started on multi-drug therapy, and public health contact tracing begins.
2. Studying Biofilms with Confocal Microscopy
Research Question: How do Pseudomonas aeruginosa and Staphylococcus aureus organize spatially in mixed biofilms on medical implants?
Methods: Bacteria are grown on catheter material sections. P. aeruginosa expresses GFP (green fluorescence), while S. aureus is stained with a red fluorophore. Confocal microscopy captures Z-stacks every 0.5 micrometers through the 50-micrometer-thick biofilm.
Findings: 3D reconstruction reveals that P. aeruginosa dominates the biofilm surface layers where oxygen is abundant. S. aureus concentrates in deeper, more anaerobic regions. Channel-like structures allow nutrient flow throughout the biofilm.
Implications: Understanding spatial organization helps explain why biofilm infections resist antibiotics—drugs can’t penetrate deep layers effectively. This guides development of biofilm-disrupting agents and combination therapies.
Equipment Guide: Lab Setups, Budget Levels & Maintenance
Low-Budget Teaching Labs
Essential Equipment: Basic compound microscope with 4x, 10x, 40x, and 100x oil immersion objectives. Built-in LED illumination. Mechanical stage. Budget: $500-2,000 per unit.
Capabilities: Bright field observation, basic microbiology practicals, Gram staining exercises, fungal identification.
Recommended: Buy microscopes with standardized parts so objectives and eyepieces are interchangeable. Consider digital camera attachments ($200-500) for projection and documentation.
Mid-Level Research Labs
Core Equipment: Research-grade compound microscope with phase contrast, DIC, and fluorescence capabilities. Multiple filter cubes for different fluorophores. High-resolution camera. Budget: $15,000-40,000.
Additional Tools: Inverted microscope for live-cell imaging ($10,000-30,000), incubation chamber for time-lapse studies, image analysis software.
Capabilities: Live bacterial imaging, fluorescence-based assays, time-lapse documentation of bacterial growth and biofilm formation, publication-quality imaging.
Advanced Core Facilities
Premium Equipment: Confocal laser scanning microscope ($200,000-500,000), spinning disk confocal for fast live imaging, super-resolution systems (STED, SIM), electron microscopes (SEM: $200,000-500,000, TEM: $500,000-2,000,000).
Support Infrastructure: Climate-controlled rooms, vibration isolation tables, dedicated computer workstations for image processing, specialized sample preparation facilities, trained technical staff.
Access Model: Most universities operate these as shared core facilities with hourly usage fees. Typical rates: confocal $50-100/hour, electron microscopy $100-200/hour plus sample preparation costs.
Maintenance & Calibration Tips
Daily: Clean objectives after oil immersion use with lens paper and appropriate solvents. Cover microscopes when not in use. Check illumination alignment.
Monthly: Clean all optical surfaces, check filter cube alignment, verify stage mechanics, inspect objectives for scratches or fungal growth.
Annually: Professional service including complete alignment check, objective cleaning and testing, light source replacement if needed, mechanical adjustments. Budget $500-2,000 depending on complexity.
Pro Tip: Keep silica gel packs in microscope storage areas to prevent fungal growth on optics. Store objectives in sealed containers. Maintain detailed usage logs to predict service needs.
The Future of Microscopy in Microbiology
Microscopy in microbiology has come an extraordinary distance from Leeuwenhoek’s simple lenses to today’s super-resolution and cryo-electron microscopy systems. Yet the journey continues accelerating.
Emerging Trends: Artificial intelligence is transforming image analysis. It automatically identifies bacterial species and counts cells. It also detects subtle phenotypic changes that human eyes miss. Machine learning algorithms trained on millions of images now outperform experts at certain diagnostic tasks.
Light-sheet microscopy enables long-term, low-phototoxicity imaging of bacterial populations over days. Adaptive optics borrowed from astronomy correct for aberrations in thick samples. Expansion microscopy physically enlarges specimens before imaging, effectively improving resolution using standard microscopes.
Miniaturization brings microscopy to point-of-care settings. Smartphone-based microscopes and portable devices allow field diagnosis in resource-limited areas. Imagine detecting tuberculosis or malaria in remote villages using a smartphone attachment.
Final Encouraging Takeaway: The microscope is your window into an invisible universe teeming with life. Start simple with bright field microscopy. Master basic techniques. Then gradually explore advanced ways as your questions grow more sophisticated.
Remember that even the most advanced imaging techniques started with fundamental questions about microbial structure and function. Your curiosity, merged with these powerful tools, can reveal discoveries that change medicine, biotechnology, and our understanding of life itself.
The microbial world is vast, largely unexplored, and waiting for observant eyes. Pick up a microscope and start looking. You never know what you might find.
Recommended Resources for Curious Minds
To deepen your understanding of microscopy techniques, these carefully selected resources provide hands-on knowledge and expert insights. As an Amazon Associate, we earn from qualifying purchases at no extra cost to you.
1. Brock Biology of Microorganisms (15th Edition)
The definitive microbiology textbook with extensive coverage of microscopy techniques, sample preparation, and stunning electron micrographs. Essential for serious students and researchers building foundational knowledge.
2. AmScope M150C-I Compound Microscope with Mechanical Stage
Perfect starter microscope for home learners and teaching labs. It includes a 40x-1000x magnification range and LED illumination. Everything needed to start exploring microbiology is available through quality optics at an accessible price point.
🛒✨ Grab Your product on Amazon
3. Carolina Biological Supply Bacteria and Fungi Prepared Slide Set
Professionally prepared slides of common bacteria and fungi, including Gram-stained specimens. Ideal for learning bacterial morphology, comparing staining techniques, and building microscopy observation skills with real microbiology specimens.
4. Introduction to Fluorescence by David M. Jameson
Comprehensive guide to fluorescence microscopy principles, fluorophore selection, and practical applications. Perfect for researchers transitioning into advanced imaging techniques who need both theoretical foundation and practical protocols.